Category: Seasons

  • Garlic Butter Shrimp Couscous with Broccoli

    Garlic Butter Shrimp Couscous with Broccoli

    Shrimp with Couscous and Broccoli

    This shrimp couscous recipe is a sponsored post in partnership with Pescanova.

    It will be of no surprise to you, our reader, that the “easy weeknight dinner” is the Holy Grail of the food blogging world. Of course we’ll happily write about a dinner-party crowd pleaser, or a weekend culinary project requiring several days of prep. But the recipes that people (including us) crave most? Something delicious you can cook up in less than half an hour on a Tuesday evening.

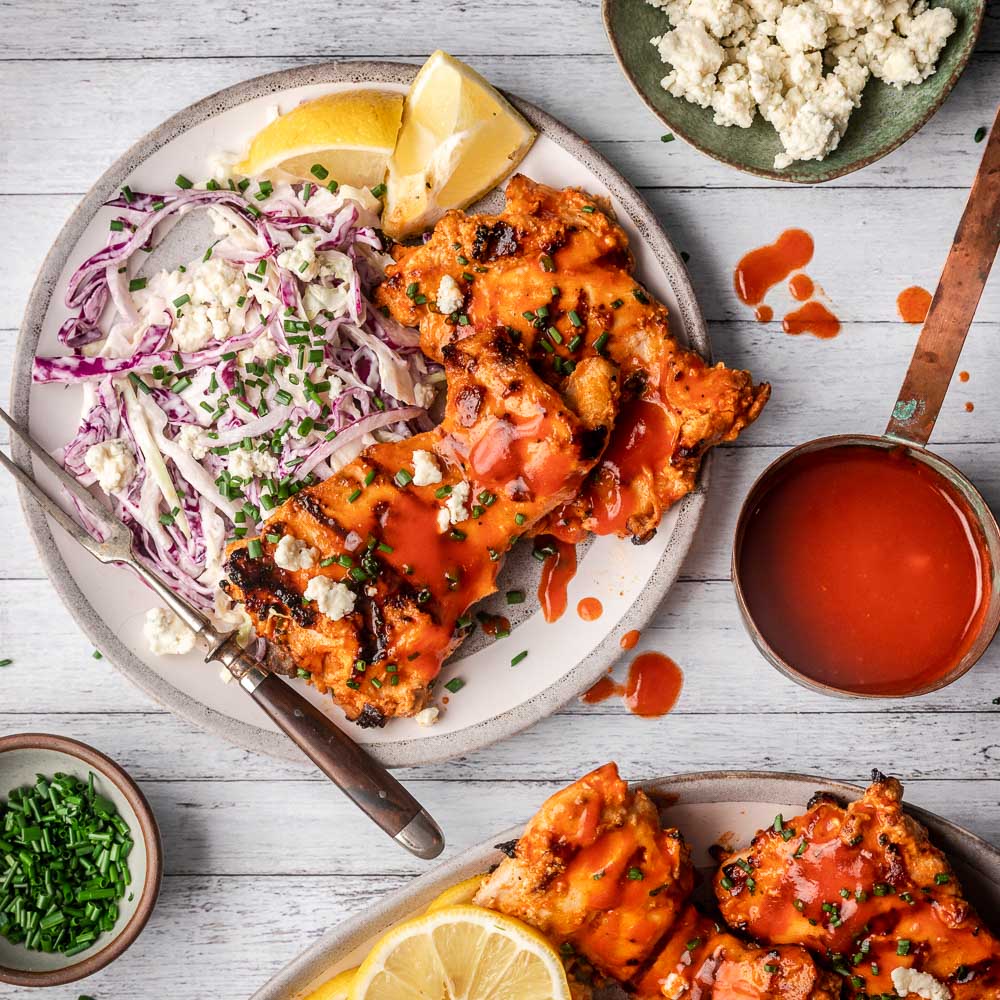
    And whenever we review our Weeknight Quickies category, one ingredient that crops up time and again is shrimp. It makes sense, of course. Shrimp cook up super quickly — for most dishes, we get the other ingredients cooked first, before adding the shrimp in the last cooking step. Their delicate flavor partners well with many recipes, from a simple garlic and butter scampi preparation to a Southern-inspired Buffalo shrimp and grits.

    Shrimp with Couscous and Broccoli

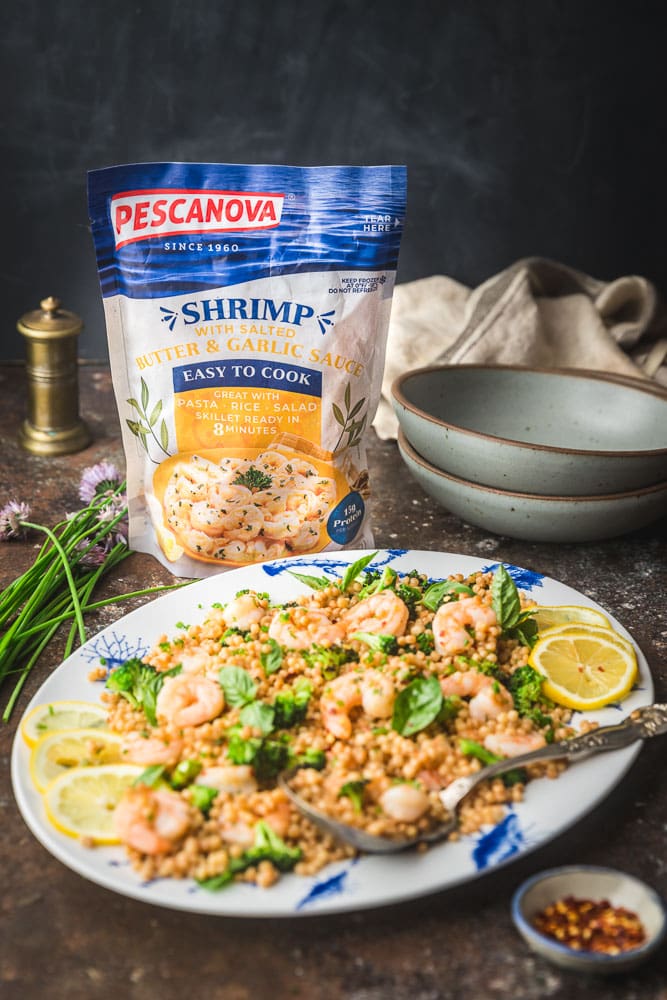
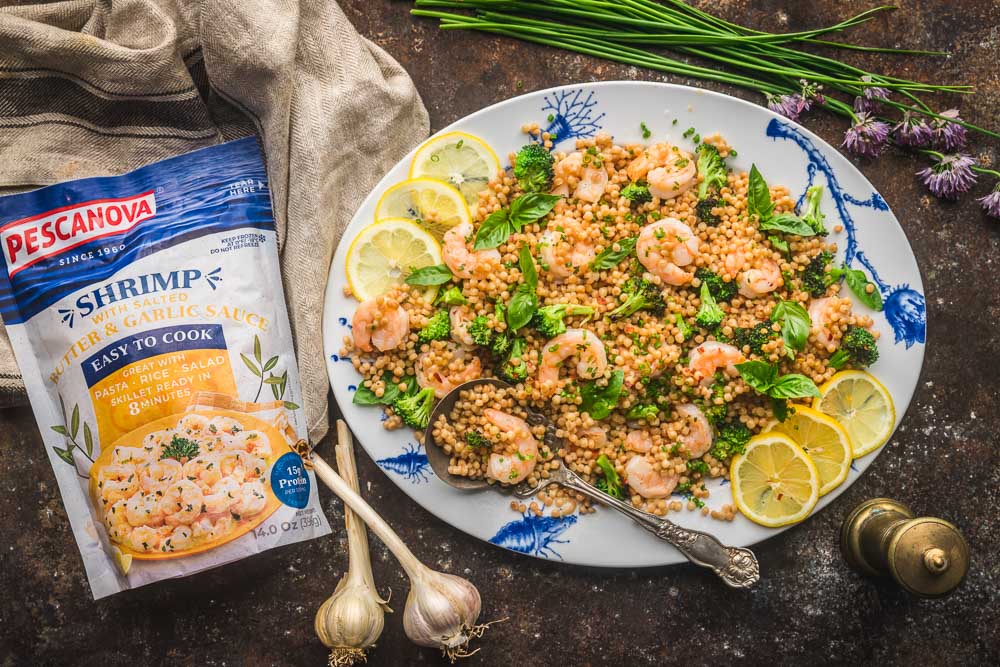
    So Pescanova’s toss and serve Shrimp with Salted Butter and Garlic Sauce ticked our boxes right away. Their sustainably-farmed white shrimp comes with its own flavored butter pats which cook up into a gorgeous garlic butter sauce right in the pan. It even cooks straight from frozen. Their shrimp is so convenient to use that we just had to keep the recipe super quick and simple. We paired it with two other quick-cooking favorites, pearl couscous and broccoli florets, to make an easy shrimp couscous.

    Shrimp with Couscous and Broccoli

    About the Couscous

    You’ll probably find several varieties of couscous — tiny spheres of pasta made from semolina — in your grocery store. The most common variety (at least in the U.S.) is the smallest grain, known as Moroccan couscous. For this recipe, we like to use pearl couscous. The pearl variety is much larger, a little like a round orzo ball. You might also find it called Israeli couscous (p’titim), but technically that’s a different product, though you can use either here.

    We often like to give pearl couscous a light toasting in the pot before adding liquid. Like most pastas, couscous doesn’t have a lot of flavor on its own, so the toasting step adds a nutty, toasty element. To do this, simply heat a little olive oil in the pot, add the couscous, and cook it, stirring it often until most of the spheres acquire a light golden brown color. It will only take a few minutes.

    Next, we cook the couscous in a little stock to give it another kick of flavor. You can absolutely use water but our preference is chicken stock (home-made if possible), but you can also use vegetable stock or, for this recipe, fish or shrimp stock if you have some. Keep it on a low simmer until it’s tender, about 10 minutes, then turn off the heat and let it sit in the covered pot until you’re ready for it. Everything else will cook up extremely quickly, so have your serving dishes ready for the shrimp couscous!

    Cooking the Broccoli and Shrimp

    Alright, since the couscous is doing its thing in another saucepan, technically this isn’t a one-pan recipe. But we like to think it gets an honorable mention, since we’re going to do everything else in a skillet and mix the couscous back in right at the end.

    Cut the broccoli florets up pretty small — no more than an inch in size. And definitely use the tender part of the stems! We keep the pieces small so they’ll sauté up and char very quickly, and not be so large that they overpower the shrimp.

    Heat a little olive oil in a skillet, then add the broccoli, turning every so often until the outside has a little bit of that gorgeous char and the thickest parts are just becoming tender, about 4 to 5 minutes. Turn the heat down to medium. Now you can toss in the hero of the recipe, the shrimp and flavored butter. The butter pats included in the bag will melt and become a delicious buttery garlic sauce as the shrimp cook. Turn the shrimp in the sauce once or twice, making sure that both sides cook. You’ll know it’s ready when the shrimp have turned pink on both sides, and are opaque in the middle. Be careful not to overcook them so they stay tender.

    Note: The packet instructions specify 8 minutes for this step, but you might find it takes less time — if you like, use an instant-read thermometer. You want the inside of the thickest part of the shrimp to be at about 145ºF.

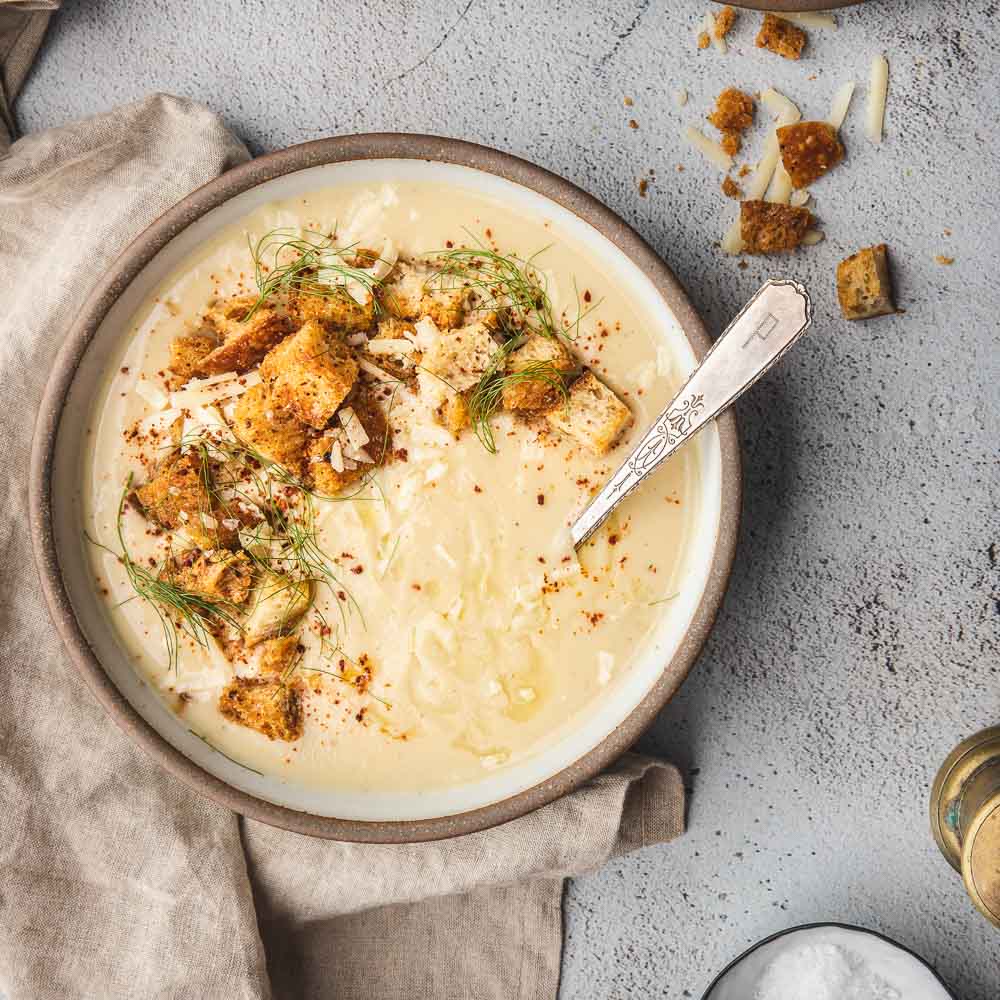
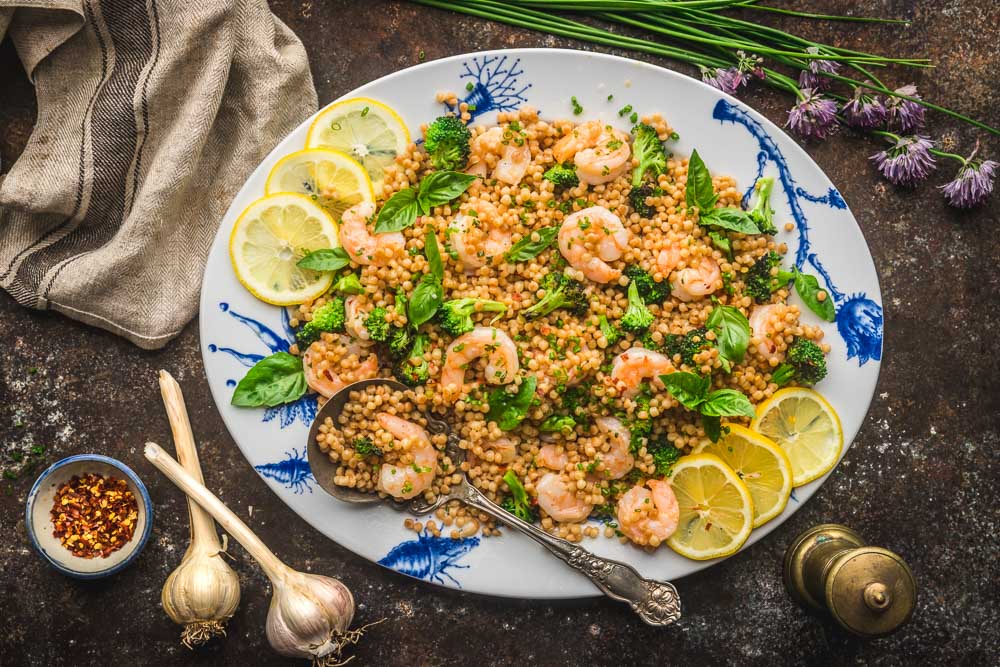
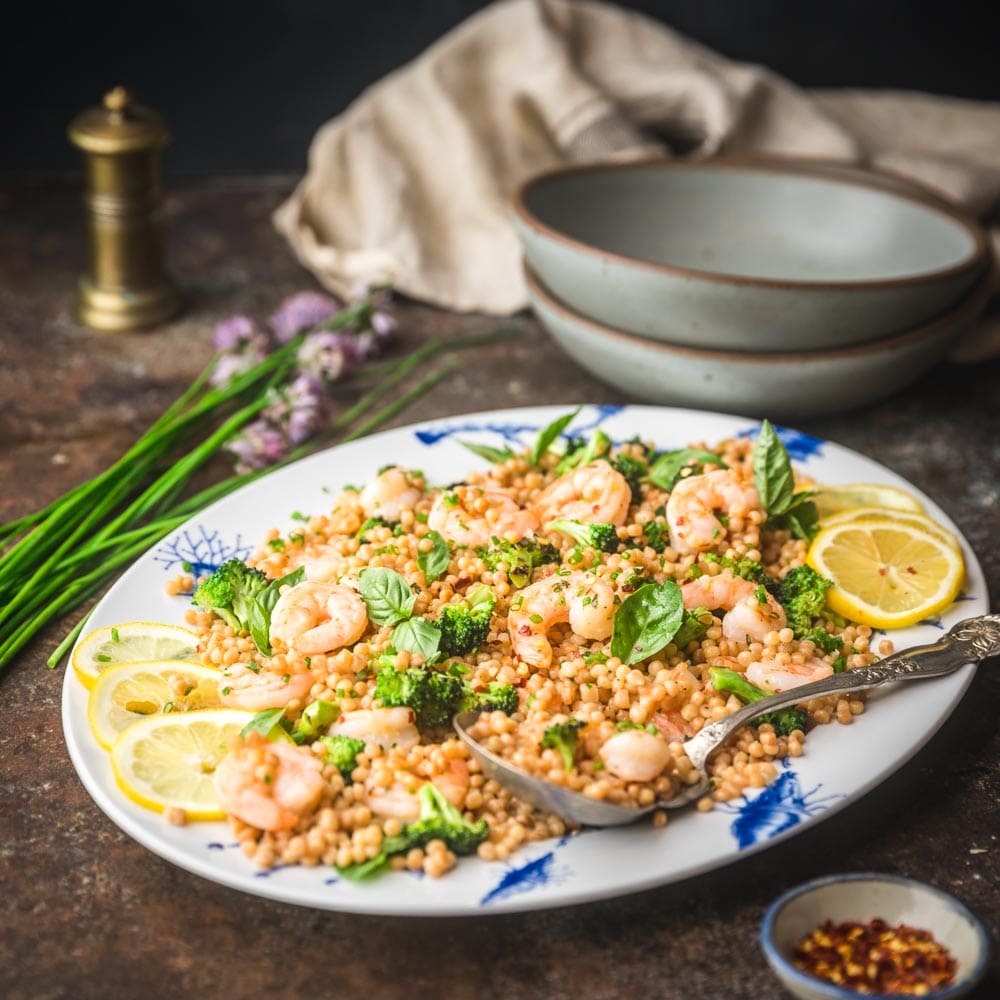
    Turn off the heat and stir in the couscous until everything is coated in that tasty sauce. Taste it for seasoning and add salt and pepper, as desired. We like to add a little fresh lemon juice, some chopped fresh herbs (basil and chives are our favorite when in season) and a little pinch of spicy red chili flakes. It’s that simple. Shrimp have always made a weeknight dinner quick, but Pescanova’s Salted Butter and Garlic Shrimp make it even more convenient. We think shrimp couscous is the perfect recipe to showcase it.

    Shrimp with Couscous and Broccoli

    Garlic Butter Shrimp Couscous with Broccoli

    When we want to whip up a weeknight dinner in just a few minutes, shrimp are the perfect solution. Pescanova's toss-and-serve shrimp in their own salted butter and garlic sauce are the star of this recipe, paired with lightly-charred broccoli and pearl couscous.

    • 2 tablespoons olive oil (divided)
    • 1 ½ cups pearl or Israeli couscous
    • 2 cups low sodium chicken broth ((or vegetable/fish broth or water))
    • 1/2 teaspoon kosher salt (plus more to taste)
    • 1/4 teaspoon freshly cracked black pepper
    • 1 small head broccoli (florets and tender stems cut into 1-inch pieces)
    • 1 packet Pescanova Salted Butter and Garlic Shrimp
    • 1 tablespoon lemon juice (plus more for serving)
    • 1/4 cup roughly chopped chives, basil and/or parsley
    1. Heat 1 tablespoon of the oil in a medium saucepan set over medium-high heat. Once the oil is shimmering, add the couscous and cook, stirring often, until the grains turn light brown and begin to smell toasty, about 2 to 3 minutes.

    2. Add the stock (or water), season with salt and pepper and brink the liquid to a boil. Lower the heat to medium and cook until all the liquid is absorbed, 10-12 minutes. Fluff with a fork and set aside.

    3. While the couscous is cooking, heat the other tablespoon of oil in a medium skillet set on medium-high. Add the broccoli and cook, tossing often, until the broccoli chars in spots and becomes tender, 5-6 minutes.

    4. Lower the heat to medium, and add the shrimp and flavored butter pats from the bag, and toss until the shrimp is fully cooked and everything is coated in the flavored butter sauce.

    5. Add the couscous and toss until combined. Stir in lemon juice and fresh herbs and transfer to a serving platter.
    Entree
    American, Fish

  • One-Pan Roasted white fish with Tomatoes, Zucchini and Olives

    One-Pan Roasted white fish with Tomatoes, Zucchini and Olives

    Roasted Fish Filets in enamel baking dish with tomatoes, courgette, olives and lemon

    Tender, flaky white fish (cod, halibut or hake) roasted to perfection over a medley of colorful roast vegetables, with a lemony, savory pan sauce — an easy fish supper all cooked in one pan!

    We’re in the business of writing about food, so curiosity about ingredients comes with the territory. But when it comes to buying fish, we’ve pretty much stuck to what we’re familiar with. We’ll usually pick up a cut of salmon fillet, or a pound of scallops if we’re feeling fancy. And there’s so much variety in sustainable fish offered at the fish counter or in the frozen aisle, it’s a shame not to branch out and try something new.

    Because we’re looking forward to the bounty of summer which is just over the horizon, we also wanted to use some of the vegetables we’ll be enjoying through the warmer months: zucchini and cherry tomatoes – though all of these vegetables happen to be available all-year round. (They also provide a gorgeous colorful presentation for the fish.) Along with the briny olives, the dish feels like taking a Mediterranean vacation! (Note: We prefer keeping our olives whole, with their pits, in the roasting dish but feel free to pit yours beforehand, or buy pitted versions if you like. Also, we love the flavor of roasted lemon slices, but you can set them aside if you don’t care for them.)

    We can just imagine having this for dinner at a restaurant by the beach.

    Tender vegetables, perfectly moist fish and a delicious wine sauce all in one pan.

    Roasting the fish

    The secret to cooking most fish is timing. Flaky white fish, especially, don’t need a lengthy roast, else they risk getting dry and tough. We roast our vegetable medley first, for about 20-25 minutes in total, to get everything thoroughly cooked and softened. The tomatoes should burst slightly, and the onions and zucchini will soften and become tender. The juices for the vegetable, along with a good splash of white wine, help to create a delightful sauce in the pan. Once the vegetables are well roasted, take the pan out of the oven and mix them up a little before laying the fish fillets over the top. For maximum flavor, season the fish filets with salt and pepper, and give them a nice drizzle of olive oil. We like to finish the fish at a lower temperature, just for about 10 minutes and it’s ready.

    (You could, as an alternative, roast the vegetables, then pan-sauté the fish in a little butter and olive oil, but we always like to keep things in one pan if possible, and that’s the plan here. Easy clean-up!)

    Side note: These same fish fillets would also be the perfect white fish to use in our American-British Fish Pie!)

    One-Pan Roasted White Fish with Tomatoes, Zucchini and Olives

    In this quick, easy and elegant dinner, filets of white fish are roasted with tomatoes, zucchini, olives and garlic. Just as delicious with perfect end-of-summer tomatoes as it is with a mid-winter pint from the grocery store. Best with thick white fish such as cod, hake or halibut.

    • 2 medium zucchini (halved lengthwise and thinly sliced)
    • 4 large shallots (or 2 small red onions, thinly sliced)
    • 2 tablespoons extra virgin olive oil (plus more for drizzling)
    • Kosher salt and freshly cracked black pepper (to taste)
    • 1 pint cherry or grape tomatoes (halved if large)
    • 3 large garlic cloves (thinly sliced)
    • 1/2 cup Kalamata olives (pitted, if desired)
    • 1/2 cup dry white wine (or dry vermouth)
    • 2 lemons (1 thinly sliced, 1 cut in wedges for squeezing)
    • 4 6-ounce mild white fish such as cod, hake or halibut
    • Chopped fresh basil, parsley and/or chives (for garnish)
    1. Heat the oven to 450ºF and set a rack in the middle.
    2. Add the zucchini and shallots to a 9×13-inch glass or ceramic baking dish. Toss with the olive oil until evenly coated and season with salt and pepper. Roast until zucchini begins to soften and brown slightly, about 10 to 15 minutes. Add the tomatoes, garlic, olives and wine and toss to mix everything together. Lay the lemon slices on top. Return to the oven and roast until tomatoes soften and release some liquid, about 10 to 12 minutes. While the vegetables roast, dry the fish very well with paper towels and season generously with salt and pepper.
    3. Lower the heat to 350ºF. Toss the vegetables once more and place the fish fillets on top of the vegetables. Drizzle the fish with a little more olive oil and roast until the fish is cooked through and flakes easily with a fork, 10 to 12 minutes.
    4. Sprinkle the herbs over the fish and serve hot, with the vegetables, and sauce spooned over the top and lemon for squeezing.
    Entree, Main Course
    American, Fish, Mediterranean
    Fish, One-pan, Roasted, Seafood, Tomatoes
  • Blood Orange and Almond Upside-down Cake

    Blood Orange and Almond Upside-down Cake

    Blood Orange Cake

    When you’re presenting a cake to your hungry guests, it’s good to have a “ta-daaa!” moment, something to add a little flair to the occasion. In the absence of a birthday candle or a mini firework, what about cocking a snook at gravity itself and turning the whole thing upside down? Upside-down cakes have been a mainstay of the dessert table for generations. We think everyone has a similar memory of at least one pineapple-and-cherry upside down cake showing up at the table at some point or another. Since citrus fruits are especially available at the moment, we decided to add blood oranges to the tradition.

    One of the most popular Upside-Down Blood Orange cake recipes is a gorgeous version by Claire Saffitz, whose book Dessert Person we highly recommend. We adapted elements of her cake as well as this blood orange cake by Melissa Clark for the New York Times. Both these cakes are cornmeal-based, but we felt the citrus flavors would work well with nutty almond flour. And it does!

    The almond flour keeps the cake incredibly moist, almost like a British steamed pudding (such as our Sticky Toffee Pudding). The combination of the sweet/tart oranges and the rich almonds is fantastic. If you want an even more pronounced almond flavor, you could add a little bit of almond extract in place of the vanilla. We liked the more subtle almond flavor. It’s definitely detectable, but doesn’t overpower the bright citrus notes.

    Citrus Flat Lay
    This cake works with all kinds of citrus, not just blood oranges.

    We love blood oranges for their gorgeous color and tart flavor, but really, you could use any type of orange. If you wanted to try other kinds of citrus, we think a grapefruit or lemon version would be amazing.

    Blood Orange Cake

    The bottom becomes the top

    I know this may shock you to learn but in an upside-down cake, the bottom actually becomes the top! Quelle Suprise?! We start with a simple caramel sauce: nothing more complicated than brown sugar melted with butter and a little juice from the blood oranges. Pour into a 9-inch cake plate that has been lined with parchment and generously greased with butter or cooking spray on the bottom and sides.

    Next goes the blood orange layer. Use a microplane to remove the zest from one of the oranges and set the zest aside to use in the batter. The trick to the beautiful orange slices is to cut the oranges in very thin rounds. If you have a mandoline, this is a great time to use it (carefully!). Otherwise, just use a sharp knife and try to keep the slices about 1/8-inch thick. If the slices are too thick, they won’t soften enough as the cake cooks and the skin will taste bitter.

    TIP: You can also remove the skin and white pith off the oranges completely if you prefer. To do this, cut the top and bottom off to expose the fruit. Make sure to use a sharp knife, and cut the skin and white pith away, following the curve of the fruit. Then slice the oranges into rounds. If you do this, you can cut the slices a little thicker without compromising the flavor of the cake. Place the rounds on top of the caramel in an overlapping pattern, or any pattern you like.

    You can also cut away the skin and white pith completely, if you’d rather.

    The sponge layer

    The moistness of this cake comes from the almond flour, but also sour cream (or yogurt). To start, whisk the almond flour, all-purpose flour, baking powder and salt together in a medium bowl. No need to go crazy but make sure there aren’t any lumps. Set the bowl aside.

    Like most cakes, start the batter by creaming the butter and sugar together until it becomes very light and fluffy. It’s essential that your butter is room temperature or you won’t be able to incorporate the tiny air pockets that give the cake volume and an even texture. This can take 3 to 4 minutes using the paddle attachment of a stand mixer and maybe around 6 to 7 minutes with a handheld beater. Scrape down the bowl as often as you need so that everything is evenly combined.

    Next add the eggs, one at a time, and beat to incorporate each egg before adding the next one. Once that’s done, add the sour cream (or yogurt), the reserved orange zest and lemon zest and lemon juice. Beat the mixture once again to fully mix it together.

    TIP: Don’t worry if the batter looks a little bit curdled from the lemon juice. It will bake up fine!

    Now you’re ready to add the dry ingredients. Take the bowl off the mixer and use a silicone spatula to fold the dry ingredients in by hand. Make sure to scrape the bottom and sides of the bowl to ensure the flour mixture is fully and evenly mixed in. Pour the batter into the cake pan over the oranges, taking care not to shift them and mess up your pattern. The cooled caramel should keep them pretty set where you placed them. Smooth the top of the batter and place the cake pan on top of a foil-lined baking sheet. This will catch any drips if the caramel overflows.

    Bake in a 350ºF oven until the top is golden brown and a toothpick inserted in the center comes out clean. The edges of the cake should be slightly darker brown and pulled away from the sides of the pan a little. This should take between 40 to 50 minutes.

    When it’s ready, remove the cake from the oven onto a cooling rack, and let it sit for 10 minutes. Run a sharp knife around the edges of the pan to loosen any stuck bits. Place a serving plate on top of the cake pan and carefully flip the cake and the plate together. (This is your “ta-daaaa!” moment. If it turns into an “oh no!” moment, no matter. It’ll still be delicious.) The cake will be difficult to move once it’s out of the pan so make it as centered as you can as you flip, if you care about such things. Lift off the pan and the parchment and let the cake cool completely before serving.

    We found the cake to be even better the next day so once it’s cool, it can be covered in plastic wrap and refrigerated until you’re ready to serve it. If you like a super shiny top, brush a little thinned apricot jam over the oranges just before serving. This cake is great with a little dollop of lightly sweetened whipped cream or yogurt on top.

    Blood Orange Upside Down Cake

    Blood Orange and Almond Upside-down Cake

    Scented with citrus and almonds, this Blood Orange and Almond Upside Down Cake is festive and delicious. The base stays moist for days thanks to the almond flour, and the bright, beautiful topping of thinly sliced blood oranges makes it a stunner.

    • Mandoline
    • Microplane zester
    • 9-inch cake pan
    • 2 to 3 medium-sized blood oranges
    • 270 grams unsalted butter (2 sticks plus 3 tablespoons, room temperature, divided (plus more for greasing pan))
    • 130 grams light brown sugar (about 2/3 cup)
    • 122 grams fine almond flour (about 1 cup)
    • 65 grams all-purpose flour (about 1/2 cup)
    • 8 grams baking powder (about 1 1/2 teaspoons)
    • 2 grams kosher or sea salt (about 1/2 teaspoon)
    • 200 grams granulated sugar (about 1 cup)
    • 4 large eggs (room temperature)
    • ⅓ cup sour cream or yogurt (room temperature)
    • 2 teaspoons finely grated lemon zest (from 1 large lemon)
    • 2 tablespoons fresh lemon juice (from the zested lemon)
    • 2 teaspoons vanilla extract (or 1 teaspoon almond extract)

    Optional:

    • 2 tablespoons apricot jam
    • Lightly sweetened whipped cream or yogurt
    1. Heat the oven to 350°F (325 with fan) and set an oven rack in the center position. Grease the bottom and sides of 9-inch round cake pan. Line the bottom of the pan with a round of parchment paper and coat it with more butter. Set the pan aside.
    2. Finely grate zest from one orange (about 2 teaspoons), and set zest aside. Slice off the tops of the oranges to expose the fruit and use a sharp knife, or even better, a mandolin, to slice oranges into very thin (1/8-inch) rounds. Remove and discard any seeds and repeat with all the oranges (you should have about 15 or 20 slices total).
    3. Squeeze 1 tablespoon of juice from the reserved ends of the oranges and add to a small saucepan. Add 3 tablespoons (45 grams) butter, and the brown sugar. Turn heat to medium and stir until sugar melts, about 3 minutes. Scrape mixture into prepared pan and tilt in all directions to spread across the parchment. Arrange the orange slices in an overlapping pattern across the bottom of the pan and set aside.
    4. In a large bowl, whisk together the almond flour, all-purpose flour, baking powder and salt. In a stand mixer fitted with the paddle attachment (or in a large bowl if using a hand mixer),  cream together the remaining 2 sticks (225 grams) butter with granulated sugar until light and fluffy, about 3 to 4 minutes. Scrape down sides and bottom of bowl as needed. Beat in eggs, one a time, letting each fully incorporate before adding the next. Add sour cream, reserved orange zest and lemon zest, lemon juice and vanilla and beat until fully mixed. Gently fold in the dry mixture by hand, scraping the bottom and sides of the bowl to make sure all the flour is incorporated. The batter might look a little curdled from the addition of lemon juice – this is normal!
    5. Gently scrape the batter over the blood orange slices, being careful not to shift them, and smooth the top. Place the cake on a baking sheet to catch any drips and transfer to the oven. Bake until cake is golden brown and a toothpick inserted in the center emerges clean, 40 to 50 minutes. Transfer the pan to a wire rack and let the cake cool for 10 minutes. Run a thin knife around the edges of the pan to loosen it then invert onto a platter and remove parchment. Allow to cool completely before serving.
    6. If you want a super shiny top, add apricot jam to a small bowl and mix with 1 teaspoon hot water to loosen. Brush the glaze over the oranges. Slice and serve with whipped cream or yogurt.
    Dessert
  • Ultra Silky Cauliflower-Cheddar Soup with Garlic Butter Croutons

    Ultra Silky Cauliflower-Cheddar Soup with Garlic Butter Croutons

    Cauliflower Cheddar Soup

    As the temperature dips down to the 40s and and the sun begins to set earlier and earlier, we know it’s time to make a hearty, cozy soup to keep our spirits up. A quick trip to the market to pick up the few things we didn’t already have: a big head of cauliflower, a block of our favorite Cabot Creamery Extra Sharp Cheddar Cheese, a little crème fraîche (though sour cream is a fine substitute), and some good bread for the garlic-butter croutons. Cauliflower-Cheddar Soup is one of our favorite winter comforts, and we think you’ll like it too.

    A few thoughts about cauliflower

    We use a yellow variety for our Mughlai Cauliflower (a light, creamy almond curry).

    Matt and I both really like cauliflower, though we’re no fanatics. You won’t find a cauliflower pizza crust in our house, but Roasted Cauliflower with Whipped Feta? Or served Mughlai-style in a creamy Almond Curry? Sign us up.

    Emily wrote an article on cauliflower and its local Hudson Valley aficionados for The Valley Table magazine (it includes some more fun recipes, go check it out). The vegetable used to be a staple in farms in our part of New York, especially the Catskills. A hundred years ago, cauliflower was known locally as “white gold” as it grew so well in the cool, moist mountain climate. Until the early half of the 20th century, our region supplied the cauliflower to the entire country. Eventually California’s vast farms began to dominate the vegetable economy, and they still do to this day (damn you, perfect California weather!).

    Luckily, you can still find excellent local cauliflower from September all the way to late December. Even when it’s not local, cauliflower is almost always available year round, so this is a great soup to make any time of year.

    it’s all about The Cheese

    Cauliflower Cheddar Soup Ingredients
    Use a really good extra sharp cheddar for the best flavor.

    Since cauliflower-cheddar soup has so few ingredients, you want to make sure that each element adds as much flavor as possible. That’s why we use Cabot Creamery Extra Sharp Cheddar because it has rich, buttery flavor, along with the signature tang. It’s the perfect foil for the silky, sweet cauliflower.

    Cabot Creamery makes some of our favorite cheddars — they’re a co-operative of around 800 farms in New York and New England who, as a certified B Corporation, adhere to the highest standards of land stewardship and sustainable farming. We also genuinely love all their products!

    Let’s make soup

    Cauliflower Cheddar Soup

    Making this soup could not be easier. Sauté some chopped onions in butter until they turn golden. Try not to brown them too much, just to keep the lovely pale color of the soup. Add the garlic and let it cook with the onions for a minute.

    Then add the stock. We love using homemade chicken or turkey stock but good store-bought is fine, as is vegetable broth if you want a vegetarian soup. Add the cauliflower, potatoes, bay leaves and thyme, raise the heat to medium-high and bring it all to a boil.

    Lower the heat to maintain a gentle simmer, and cook until the cauliflower and potatoes are very tender, about 15 to 20 minutes. You should be able to pierce the vegetables with a paring knife with little to no resistance. Remove the bay leaves and discard them. Work in batches as needed to carefully transfer the vegetables and broth to a blender. Note: Do not fill the blender past the maximum fill line or the soup could overflow!

    Remove the knob from the lid of the blender (to allow the steam to escape), and hold a tea towel over the hole to prevent any hot soup from spraying out. Blend until the mix becomes completely smooth. Repeat with the rest of the soup. (You could also use an immersion blender straight in the pot, but the results won’t be quite as silky smooth).

    Return the blended soup to the pot, bring it back to a gentle simmer and stir in the crème fraîche (or sour cream) and fresh nutmeg. Whisk in the 1 1/2 cups of the cheese, a handful at a time, stirring constantly, until its melted and fully combined. Taste and adjust the seasoning with kosher salt and pepper, as desired.

    Cauliflower Cheddar Soup

    Three words: Garlic Butter Croutons

    While the soup is simmering, make the Garlic-Butter Croutons. Start off by heating the oven to 350ºF and set a rack in the middle. Add the butter, olive oil, and garlic to a small saucepan set on medium-low heat. Cook, stirring often, until butter melts and the garlic just beings to sizzle, about 3 minutes. Be careful not to let the garlic become too brown. Turn off the heat. Add the bread to large bowl and pour the garlic-butter over the cubes. Toss until all the cubes are lightly coated. Season with salt and pepper and toss again. Transfer the bread to a rimmed baking sheet, spreading them out to a single layer. Bake until they turn golden brown and crunchy, about 15 to 20 minutes. The croutons will keep in an airtight container for 1 week. 

    Ladle, top, serve

    Ladle the hot cauliflower-cheddar soup into bowls, then top with a little of the reserved cheddar and a few croutons. We like to make the bowls a little sexy with a swirl of good, peppery olive oil, a sprinkle of chili flakes for heat, and a light scattering of herbs, if we have any laying around (we used fennel fronds, but snipped chives, parsley or dill would be great as well).

    Cauliflower Cheddar Soup

    Ultra Silky Cauliflower-Cheddar Soup with Garlic Butter Croutons

    Cozy as a sweater (but fancy, like a nice cashmere one), this Cauliflower-Cheddar soup is silky and rich, even without any heavy cream. It's incredibly easy to make, and absolutely packed with flavor from caramelized onions and tangy extra-sharp cheddar cheese. Crunchy Garlic-Butter Croutons are the perfect topper.

    • Blender or stick blender

    For the Soup:

    • 2 tablespoons unsalted butter
    • 2 large yellow onions (diced (about 3 cups))
    • 1/2 teaspoon kosher salt (plus more, to taste)
    • 1/4 teaspoons freshly ground black pepper (plus more, to taste)
    • 3 large garlic cloves (minced)
    • 6 cups homemade or low sodium chicken or vegetable stock
    • 1 large or 2 small cauliflower (separated into small florets and core diced, (about 2 pounds))
    • 3 medium Yukon gold potatoes (peeled and diced (about 2 1/2 cups))
    • 2 bay leaves
    • 1 teaspoon fresh thyme leaves
    • 8 ounces grated extra sharp cheddar cheese, divided ((2 cups))
    • 1/4 cup creme fraiche or sour cream
    • 1/4 teaspoon freshly grated nutmeg

    For the Garlic Croutons

    • 2 tablespoons unsalted butter
    • 1 tablespoon extra virgin olive oil
    • 2 large garlic cloves (minced or grated)
    • 1/4 teaspoon kosher salt
    • 1/4 tsp freshly ground black pepper
    • 1/2 Italian or country or sourdough loaf, (cut into 1/2-inch cubes (about 1/2 pound, 3 cups cubes))

    Optional toppings

    • Spicy red chili flakes
    • Chopped soft herbs (like dill, parsley or chives)
    • Extra virgin olive oil (for drizzling)

    Make the Soup:

    1. Melt the butter in a large Dutch oven set over medium heat. Add the onions, salt and pepper. Cook, stirring often, until the onions turn soft and golden, about 7 to 10 minutes. Add the garlic and stir until fragrant, about 1 minute.
    2. Add the stock, cauliflower, potatoes, bay leaves and thyme, raise the heat to medium-high and bring it to a boil. Lower the heat to maintain a gentle simmer and cook until the cauliflower and potatoes are very tender, about 15 to 20 minutes. Remove the bay leaves and discard. Work in batches as needed to carefully transfer the vegetables and broth to a blender and blend until completely smooth. (You could also use an immersion blender but the results won’t be quite as smooth). Note: Do not fill the blender past the maximum fill line or the soup could overflow!
    3. Return the blended soup to the pot, bring it back to a gentle simmer and stir in the creme fraiche and nutmeg. Whisk in the 1 1/2 cups of the cheese, a handful at a time, stirring constantly, until melted and combined. Taste and adjust seasoning with kosher salt and pepper, as needed.

    While the soup is simmering, make the croutons:

    1. Heat the oven to 350ºF and set a rack in the middle. Add the butter, olive oil, and garlic to a small saucepan. Turn the heat to medium-low and cook, stirring often, until butter melts and the garlic just beings to sizzle, about 3 minutes. Turn off the heat. Add the bread to large bowl and pour the garlic-butter over the cubes. Toss until all the cubes are lightly coated. Season with salt and pepper and toss again. Transfer the bread to a rimmed baking sheet, spreading them out to a single layer. Bake until they turn golden brown and crunchy, about 15 to 20 minutes.

    2. Divide into bowls top with a sprinkling of the reserved cheese, a few garlic-butter croutons, and if desired, a swirl of olive oil, some chili flakes and a sprinkle of chopped herbs.

    This soup keeps well in the refrigerator, covered, for about 4 days, or for several months in the freezer.

    The croutons will keep in an airtight container for 1 week.

  • Goat Cheese-stuffed Phyllo Triangles with Hot Honey Drizzle

    Goat Cheese-stuffed Phyllo Triangles with Hot Honey Drizzle

    A good rule of thumb when it comes to staying sane in the kitchen is: don’t be a hero. Make what you enjoy and take help where you can get it. For example: we’ve seen enough episodes of The Great British Baking Show to know that attempting to hand-make incredibly finicky, paper-thin sheets of perfectly even phyllo dough is beyond us, thank you very much. Luckily we don’t need to be star bakers because pre-made, frozen phyllo is wonderful and readily available at most larger grocery stores. Take that, Paul Hollywood!

    There are lots of ways to use phyllo – to encase a Chicken, Ricotta and Swiss Chard Torte, as the ruffled topping for a Creamy Chicken and Caramelized Onion Pot Pie, or as Mini Phyllo Cups with Cappuccino Cream. Here we use it to make crisp little triangular parcels stuffed with a delicious mix of cheeses (tangy goat and earthy smoked mozzarella). A few cubes of fresh peach and a sprinkle of herbal thyme round out the flavor. This is exactly what we want to snack on while drinking a glass of full-bodied wine, like our new favorite from California, Rebellious.

    Rebellious, a red wine Blend from california

    CAKEBREAD REBELLIOUS Phyllo Goat Cheese Triangles
    Rebellious has notes of dark cherry, cardamom, black pepper and sandalwood.

    When Rebellious contacted us about about developing a recipe that would complement their wine, we knew we wanted to go bold with flavor. Because Rebellious is not an ordinary wine. It’s a deep, luxurious red that has an unexpected twist: a dash of white. The combination brings brightness and acidity to the rich notes of dark cherry, brown sugar, dark chocolate and cola. Hints of cardamom, black pepper, sandalwood and licorice add spice to the glass. There are layers of flavor in the wine, and we wanted to mirror that in the dish we would serve along with it.

    Cakebread Pinot Noir

    Rebellious is the perfect wine to enjoy with a few friends, while you snack on a board of excellent cheese and charcuterie. Maybe some ripe figs and spicy salami. We like to add something warm to the table while keeping the mood fun and informal and these Goat Cheese-stuffed Phyllo Triangles fit the bill perfectly. They can be enjoyed as finger-food or served plated as a first course. The shatteringly crisp phyllo dough encases a warm, decadent filling of tart chèvre (fresh goat cheese), smoked mozzarella, tiny cubes of fresh peach and a scattering of herbal thyme leaves. Don’t forget the spicy honey drizzle!

    CAKEBREAD REBELLIOUS Phyllo Goat Cheese Triangles

    What is Phyllo Dough (AKA FILO)?

    Phyllo dough, a style of unleavened pastry dough used to make both sweet and savory dishes, is thought to have originated in Medieval Turkey in the 11th century. It’s a common ingredient in many Middle Eastern and Mediterranean dishes, probably best known for the Greek dessert, Baklava. It’s usually brushed with melted butter or olive oil, and can be layered, stacked, ruffled, rolled or folded. When baked, it creates a crisp and flaky texture.

    You’ll most often find it sold as 9 x 14-inch sheets, though 14 x 18-inch sheets are available. We find the large sheets much more difficult to handle and almost always use the smaller size, including here. The large sheets can be cut in half for this recipe.

    The Filling

    This is a simple filling that combines the tart creaminess of fresh goat cheese with gooey smoked mozzarella. A little grated garlic and fresh thyme round out the flavor. We added little cubes of fresh peach because it’s peach season here and we couldn’t resist. If peaches are not in season you could absolutely use frozen, or substitute just a little spoonful of peach preserves. You could also leave the fruit out since there will be plenty of sweetness from the hot honey drizzle. Note that we don’t mix the peach cubes into the filling since they’re soft and would dissolve.

    Phyllo Goat Cheese Triangles
    The honey is spiced with fruity Aleppo pepper and just a little vinegar.

    Speaking of the hot honey drizzle

    This stuff is amazing on anything. Try it with a sharp blue cheese or an aged cheddar. Drizzle it on pepperoni pizza. Yes, pizza. Or cornbread, roasted figs, or fried chicken. We like using fruity, moderately spicy Aleppo-style pepper flakes, but any pepper flakes you have in your spice drawer will work. If you’re not sure how hot your flakes are, start with 1 teaspoon and keep adding until you like the heat level. The heat will grow a bit as the honey sits. The Hot Honey will keep in a sealed glass jar for weeks.

    Assemble the Triangles

    The phyllo sheets dry out quickly so make sure all the filling elements are ready before you unwrap the dough. Keep the phyllo under a very slightly moist kitchen towel. Take one phyllo sheet from under the towel and lay it on a clean work surface (a large cutting board is perfect). Brush the sheet lightly with melted butter. The easiest way without ripping the dough is to dot little spots of butter all over, then gently distribute it with the brush. (The pastry doesn’t need to be doused with butter, just moistened.) Repeat the process with 2 more sheets, making a layered stack of 3 buttered sheets of dough. Don’t worry if there are a few little tears or cracks, phyllo is very forgiving.

    Using a sharp knife or a pizza cutter, cut the sheet into 3 long strips. Add about a tablespoon of the cheese mixture to one end of the strips, about an inch from the end. Nestle a few cubes of peach (or a scant 1/2 teaspoon of preserves) on top of the cheese. Fold one corner of the pastry up and over the filling, forming a triangle. Then fold the triangle straight forward, then again on a diagonal. Continue folding, forming a triangle each time, until you reach the end of the strip. Don’t overthink it, any way you fold it and end up with a triangle will be fine. Place the triangles on a parchment-lined baking tray and cover them with another lightly moistened towel so they don’t dry out.

    Once assembled, lightly brush the tops with just a little more butter. Bake the stuffed phyllo triangles in a pre-heated 375ºF oven until they turn golden brown and crisp, about 20 to 25 minutes. Let them cool for at least 10 minutes before biting into them.

    Store them in the refrigerator once they’ve cooled to room temperature. They reheat beautifully and can be made a full day or two ahead. To reheat them, place them on a baking tray on a single layer. Place them in a 250ºF oven until crisp and warmed through, about 10 minutes.

    You can freeze the unbaked stuffed phyllo for up to 2 weeks in airtight containers, separated by layers of parchment. When ready, bake them straight from the freezer, adding 5 to 7 minutes to the baking time.

    Goat Cheese-stuffed Phyllo Triangles with Hot Honey Drizzle

    These crisp and buttery phyllo triangles are stuffed with tart, creamy goat cheese, smokey mozzarella and sweet peaches. Serve them warm and drizzled with our addictive sweet and spicy honey. These are perfect for as finger food for a party (remember those?) or as a plated appetizer.

    For the Phyllo Triangles

    • 8 ounces goat cheese ((chèvre), room temperature)
    • 4 ounces smoked mozzarella cheese (cut into small (about 1/4-inch) cubes)
    • 1 medium garlic clove (grated or minced)
    • 2 teaspoons minced thyme leaves (or 1 teaspoon dried) (plus more for garnish)
    • 1 extra large egg (lightly beaten)
    • 1/4 teaspoon kosher salt
    • 1/4 teaspoon freshly ground black pepper
    • 18 sheets (9×14-inch frozen phyllo dough, thawed*)
    • 8 tablespoons unsalted butter (melted)
    • 1 small ripe peach (peeled, cut into small cubes (or about about 1/4 cup frozen and thawed) or 1/4 cup peach preserves)

    For the Hot Honey Drizzle

    • 1/2 cup honey
    • 1 -2 teaspoons Aleppo-style chili flakes (or 1 teaspoon red pepper flakes)
    • 2 teaspoons white wine vinegar
    1. Add the goat cheese, mozzarella, garlic, thyme, eggs, salt and pepper to a large bowl. Mix well until fully combined.
    2. Heat the oven to 375°F. Line a baking sheet with parchment.
    3. Lay one sheet phyllo dough on a clean work surface; lightly but thoroughly brush with melted butter. Place another sheet of phyllo on top of the first and brush it with butter. Repeat with a third sheet of phyllo and brush it with butter. Use a sharp knife or pizza cutter to cut the short side of the phyllo into 3 long strips.
    4. Place 1 tablespoon of the filling about an inch from the bottom of each phyllo strip. Place a couple of cubes of peach on top of each mound of filling (or substitute a 1/2 teaspoon of peach preserves). Fold the lower right corner of the pastry up and over the filling, forming a triangle. Fold the triangle straight forward, then again on a diagonal. Continue folding, forming a triangle each time, until you reach the end of the strip.
    5. Transfer to the lined baking sheet and lightly brush the triangle on top with a little more butter. Use the remaining phyllo and filling to make the rest of the triangles, placing them on the baking sheets with a little space in between each. Bake the triangles until golden brown, about 20 to 25 minutes. Let cool for at least 10 minutes before serving.
    6. While the triangles are baking, make the hot honey. Add the honey and chili flakes to a small sauce pan and heat on low, stirring often, simmering. Turn off heat and stir in the vinegar. Allow to cool for 10 minutes, then transfer to a small serving bowl or airtight container.
    7. Serve the triangles warm, with a drizzle of Hot Honey over each.

    Make-Ahead Tip: The unbaked triangles can be frozen for up to 2 weeks in airtight containers, separated by layers of parchment. When ready, bake them straight from the freezer, adding 5 to 7 minutes to the baking time.

  • Grilled Buffalo Chicken Thighs with Blue Cheese Slaw

    Grilled Buffalo Chicken Thighs with Blue Cheese Slaw

    Grilled Buffalo Chicken Thighs with Blue Cheese Slaw

    If you’re looking for an easy, delicious dinner, boneless, skinless chicken thighs are your best friend. They cook up in minutes, can be flavored a million different ways and are perfect for the oven, stovetop or grill. For this dish, we took inspiration from one of America’s favorite bar snacks: Buffalo Wings with Blue Cheese Dip.

    Marinated in a zingy mix of Greek yogurt, hot sauce, garlic and lemon, these cook up tender and juicy. The grill also gives them that perfect bit of char on the edges (though when it gets cold, we’re going to bake them in the oven because there’s just no way we’re going several months without eating this deliciousness). As well as the marinade, they get brushed with more buffalo sauce once they’re done grilling (a lip-smacking mix of hot sauce, butter and honey). We serve it with a cool, crunchy slaw tossed with a tangy dressing and blue cheese crumbles. It’s a dish that’s packed with flavor, but it’s also healthy and light enough for a summer get together.

    If dark meat is not your thing, this buffalo chicken recipe works just as well with breasts – though breasts are more prone to overcooking so check them often. You could also use bone-in pieces, though you’ll want to add between 5 and 10 minutes to the cooking time, depending on the size of the pieces.

    Yogurt: the king of marinades

    We love yogurt-based marinades for chicken because, like buttermilk, the lactic acid in yogurt is a tenderizer. While vinegar or lemon-based marinades can toughen proteins and turn them rubbery if left too long, yogurt is much more gentle and can be left for a full day without any risk of compromising the texture.

    That means you can actually freeze the chicken in the marinade, making it even easier for quick weeknight cooking. To do this, toss the chicken in the marinade, divide it up into 2 or 3 smaller sealable bags or airtight, freezer-safe containers (the smaller containers keep the defrosting time shorter). Freeze the chicken for up to 2 weeks. When ready to use, move the bags to the refrigerator and let them thaw overnight, then proceed with the recipe as written.

    Grilled Buffalo Chicken Thighs with Blue Cheese Slaw
    A yogurt marinade both tenderizes and seasons the chicken thighs. Buffalo Sauce is brushed on at the end.

    WHAT IS “BUFFALO SAUCE”?

    Buffalo sauce is combination of a vinegar-based hot sauce (traditionally Franks Red Hot) mixed with melted butter (the ratio varies, depending on how mild and creamy you like your sauce). The butter tempers the heat, as does the little bit of honey we like to add. The result is a moderately spicy, rich sauce that is traditionally slathered on crispy chicken wings, but is also great on so much more.

    Make the Marinade

    The marinade is simple: mix together the yogurt, hot sauce, oil, lemon juice, garlic, honey, salt and pepper. You can do this in a bowl or a sealable plastic bag. Add the chicken and toss it really well to make sure each piece is thoroughly coated. Cover the bowl or seal the bag and transfer it to the refrigerator for at least 3 hours or, even better, overnight.

    Make the Buffalo Sauce

    Add the hot sauce, honey and butter to a small saucepan and bring it to a simmer, stirring until the butter is melted. Note: we don’t add a lot of butter so if you like a milder sauce, stir in another tablespoon or two of butter until the flavor is to your liking. Turn off the heat and set it aside. It can be made up to 2 days ahead and reheated, if desired.

    Blue Cheese Slaw

    Make the Blue Cheese Slaw

    Or is it bleu cheese? Whatever. This isn’t the place for super fancy, $40/pound cheese. An inexpensive bold Danish blue, or even a package of pre-crumbled would be absolutely fine here. You may not need to add all the dressing, depending how much cabbage ends up in your bowl.

    To make the dressing, stir together the mayonnaise, buttermilk (or sour cream), vinegar, salt and pepper to combine. 

    Add the cabbages and onion to a bowl and stir in 3/4 of the dressing. Toss until everything is coated. Stir in more dressing, if needed. Add the blue cheese and toss gently, trying not to break up the cheese crumbles too much. Cover and refrigerate for at least 30 minutes before serving.

    Grill the Chicken

    Set up a gas or charcoal grill for indirect grilling (high heat on one side, low on the other). Clean and oil the grates. Remove the chicken from the marinade, allowing any excess to drip back in the bowl. Some marinade clinging to the chicken is fine. Discard the marinade. Placing the chicken on the hot side of the grill, cook until brown and charred in spots, around 5 minutes. Flip and grill until cooked through, about 5 minutes longer (chicken should read around 165ºF in the thickest part). If the chicken is getting too charred, move it over to the cooler side of the grill and continue cooking. Transfer the chicken to a platter and spoon or brush over the reserved Buffalo Sauce. Let the buffalo chicken rest for 5 minutes before serving. 

    Grilled Buffalo Chicken Thighs with Blue Cheese Slaw

    Serve the buffalo chicken thighs with extra sauce on the side, along with some chopped chives and a lemon wedge for squeezing.

    Grilled Buffalo Chicken Thighs with Blue Cheese Slaw

    If you're looking for an easy, delicious dinner, boneless, skinless chicken thighs are your best friend. They cook up in minutes, can be flavored a million different ways and are perfect for the oven, stovetop or grill. For this dish, we took inspiration from one of America's favorite bar snacks: Buffalo Wings with Blue Cheese Dip.

    For the Chicken Marinade:

    • 1 cup Greek yogurt
    • 1/2 cup

      hot sauce (recommended: Frank’s
 Red Hot)

    • 3 tablespoons extra virgin olive oil
    • 2 tablespoons fresh lemon juice
    • 3 large garlic cloves (minced or grated)
    • 1 tablespoon honey
    • 2 teaspoons kosher salt
    • 1 teaspoon freshly ground black pepper
    • 8 boneless skinless chicken thighs (or breasts)

    For the Buffalo Sauce:

    • 6 tablespoons

      hot sauce (recommended: Frank’s
 Red Hot)

    • 2 tablespoons honey
    • 1 tablespoon unsalted butter, (or more, as desired)

    Optional garnishes:

    • 2 tablespoons minced chives or scallion greens
    • 1 lemon (sliced, for squeezing)
    1. In a large bowl or resealable plastic bag, mix the yogurt with the hot sauce, oil, lemon juice, garlic, honey, salt and pepper. Add the chicken and turn to ensure each piece is thoroughly coated. Cover the bowl or seal the bag and transfer to the refrigerator for at least 3 hours or, even better, overnight.
    2. To make the Buffalo Sauce, add the hot sauce, honey and butter to a small saucepan and bring to a simmer, stirring until the butter is melted. Turn off the heat and set aside.
    3. Set up a gas or charcoal grill for indirect grilling (high heat on one side, low on the other). Clean and oil the grates. Remove the chicken from the marinade, allowing any excess to drip back in the bowl; discard the marinade. Place the chicken on the hot side of the grill and cook until brown and charred in spots, about 5 to 7 minutes, flip and grill until cooked through, about 5 minutes longer (chicken should read around 165ºF in the thickest part). If chicken is getting brown too quickly, move it over to the cooler side of the grill. Transfer the chicken to a platter and spoon or brush over the Buffalo Sauce. Let the chicken rest for 5 minutes before serving.
    4. Scatter over the chives, add some lemon for squeezing, and serve with Blue Cheese Slaw (recipe below).
    Entree
    American
    grill, Summer

    Blue Cheese Slaw

    A classic coleslaw, but kicked up with flavorful blue cheese. The cabbage is crisp, the dressing is both tart and creamy. Its the perfect side dish.

    • 3/4 cup mayonnaise
    • 1/2 cup buttermilk (or use sour cream)
    • 2 tablespoons apple cider vinegar
    • 1 teaspoon kosher salt
    • 1/2 teaspoon freshly ground black pepper
    • 1/2 medium green cabbage (cored, quartered and thinly sliced)
    • 1/2 small red cabbage (cored, quartered and thinly sliced)
    • 1/2 small red onion (halved lengthwise and cut crosswise into thin slices)
    • 1/2 cup crumbled blue cheese
    1. In a small bowl, stir together the mayonnaise, buttermilk (or sour cream), vinegar, salt and pepper until well combined.
    2. Add the cabbages and onions to a large bowl and toss to combine. Stir in 3/4 of the dressing and toss until coated. Add more dressing, if needed. Add the blue cheese and toss gently, trying not to break up the cheese crumbles too much. Cover and refrigerate for at least 30 minutes before serving.
    Salad, Side Dish
    American
    Blue Cheese, Buffalo, Cabbage, Coleslaw