We often get asked what camera we shoot with, what lens we use, etc, so we decided to put together a guide to our equipment, both current and what we started with.
It’s a peek around the magic curtain at how we do what we do. Eventually we plan to add some photos of our setup along with tutorials, tips and tricks we’ve learned along the way.
Whether you’re starting your own food blog, our want to learn more about food photography, hopefully this guide can help.
Equipment List
For major equipment, we’ve linked to B&H and/or Adorama. You may have other local vendors you prefer.

CAMERA BODY
We started our blog in 2012 using just our iPhone camera and honestly, it was all we needed for a long time. If you’re just starting out, save your money and practice with your phone until you know what kind of photos you want to take. Having professional equipment is great, but you can learn about light, styling, how to use props, etc, with what you already have. Once you’re sure it’s your passion, then it’s time to invest in a camera.
Our main camera is the Canon R5 mirrorless. It’s a relatively recent purchase for us and we love it. We also use a Canon 6D Mk II.
Our first DSLR camera body was a Canon 6D Mk 1 which is quite outdated but it was a fantastic workhorse camera body. We still use it when we need a third camera body.
LENSES
If I had to choose between spending a lot of money on a camera body or on a lens, I would choose the lens every time. A lens generally has a greater impact on a photo’s feel and look. A high quality lens can definitely make your photos sharper, and give the images more contrast and clarity.
My absolute favorite lens is the Canon EF 100mm f/2.8L IS USM Macro. It’s incredibly sharp and captures an astonishing amount of detail. It’s mostly used for side angle shots and there’s definitely a learning curve with this lens. I’m glad I waited before investing in it.
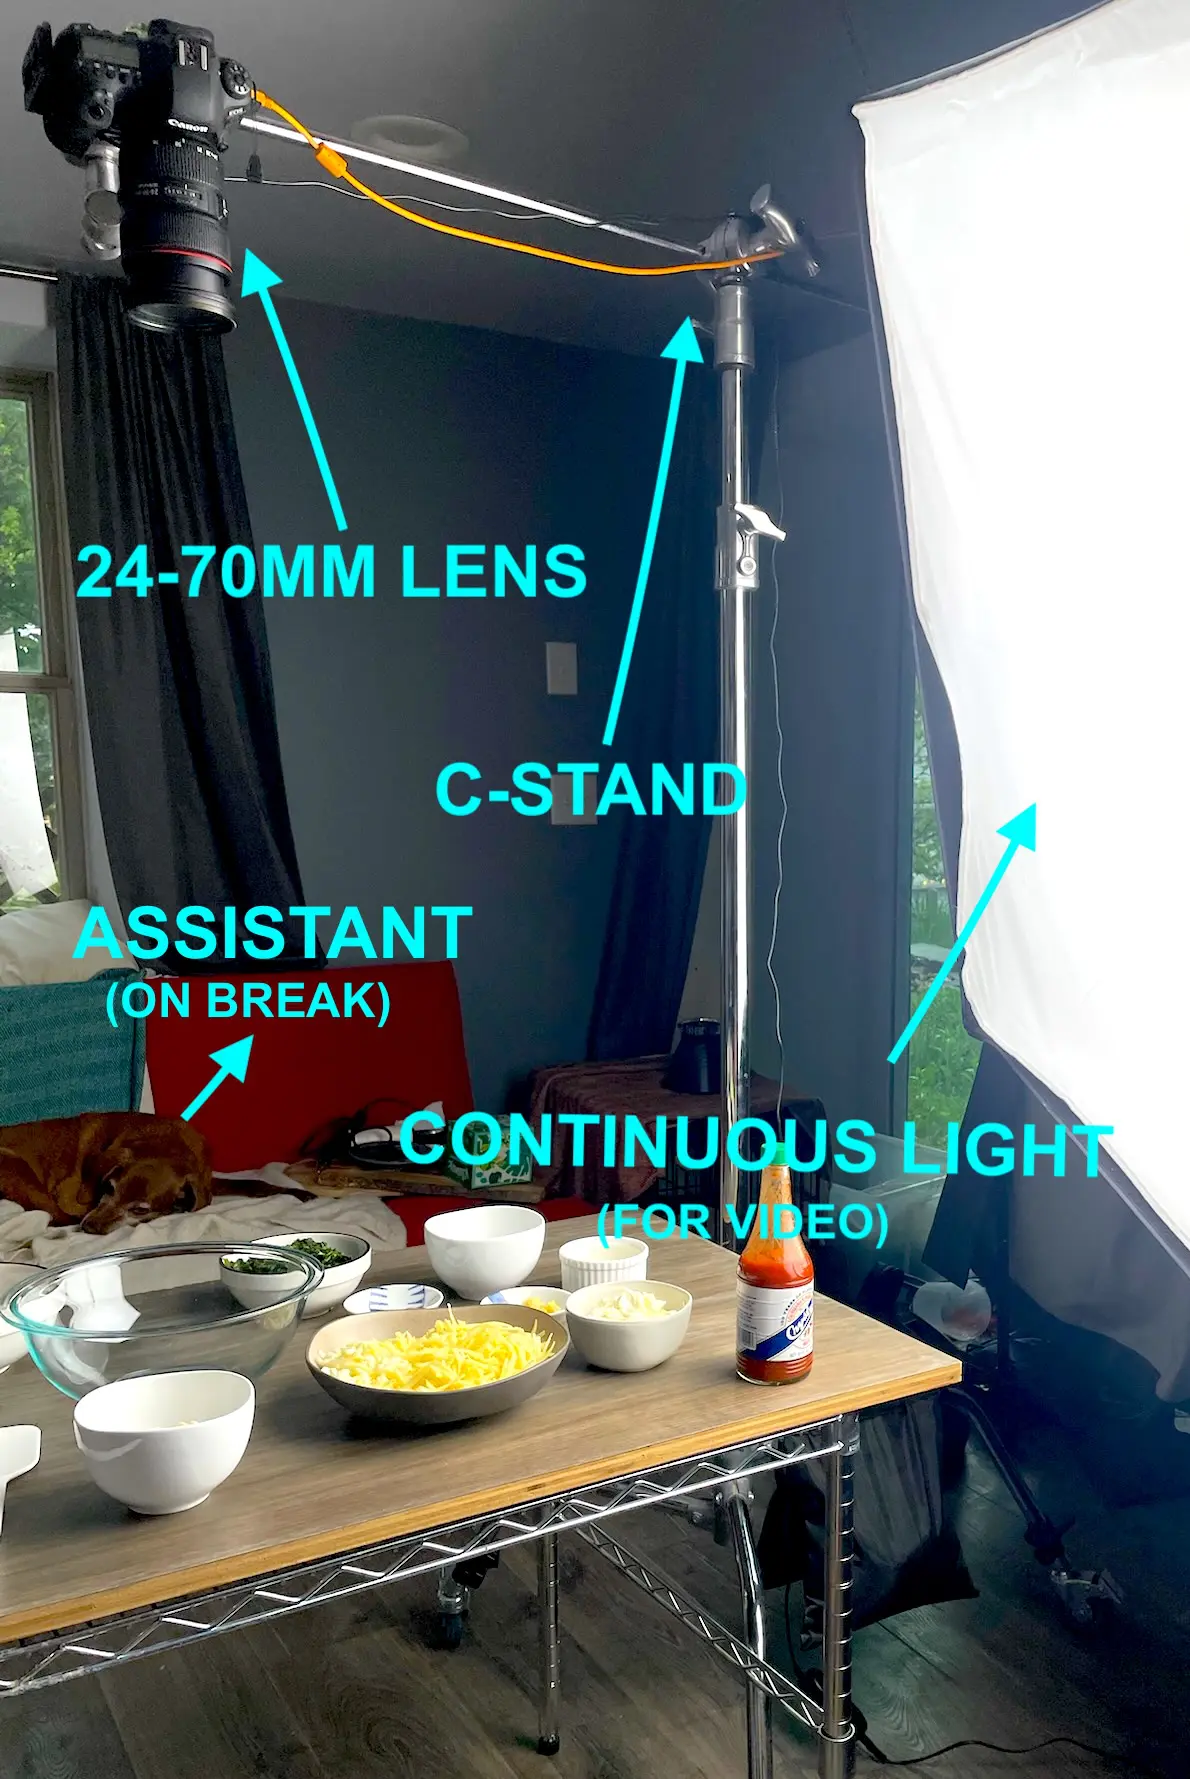
A fantastic all-around lens is the Canon EF 24-70mm f/2.8L II USM. We use it for most of our overhead shots and whenever we need flexibility in composition. Those 2 lenses are pretty much all we need, at least for now.
If you’re just starting out and want a good but affordable lens, I recommend the Canon EF 50mm f/1.8 STM. There’s a reason food photographers refer to the 50mm as the “nifty fifty”. They’re affordable, versatile and create beautiful images, especially in low light and when a shallow depth of field is desired. You can find a great 50mm lens that’s compatible with any DSLR you have.
TRIPOD LEGS
Some people love to shoot handheld and I understand why; it’s much easier and quicker to shoot a variety of different angles, without having to move equipment around each time. But for me, learning to shoot on a tripod (as well as tethered to a laptop) was a huge step forward in capturing the types of images I wanted to create. It forced me to really think about composition and framing before any food even hit the set.
We went through several sets of cheap tripod legs that broke easily and drove us nuts, until we finally invested in the Manfrotto 055. It’s not the fanciest tripod out there, but it’s sturdy and also light enough for us to move around easily on set. It also has an extension arm for overhead shooting (though we use a C-Stand for that, see below)
TRIPOD HEAD
There are a lot of different styles of tripod heads, so it may take some trial and error to find the one that works best for you. Pistol grip ball heads are great for making quick and easy adjustments. Pan and tilt heads are useful for video. Geared heads are best for precision, but they’re slower to adjust.
We started with the Manfrotto 308RC ball head and then the Vanguard GH-100 pistol grip ball head. We now use the Benro Geared 3-way head and love it.
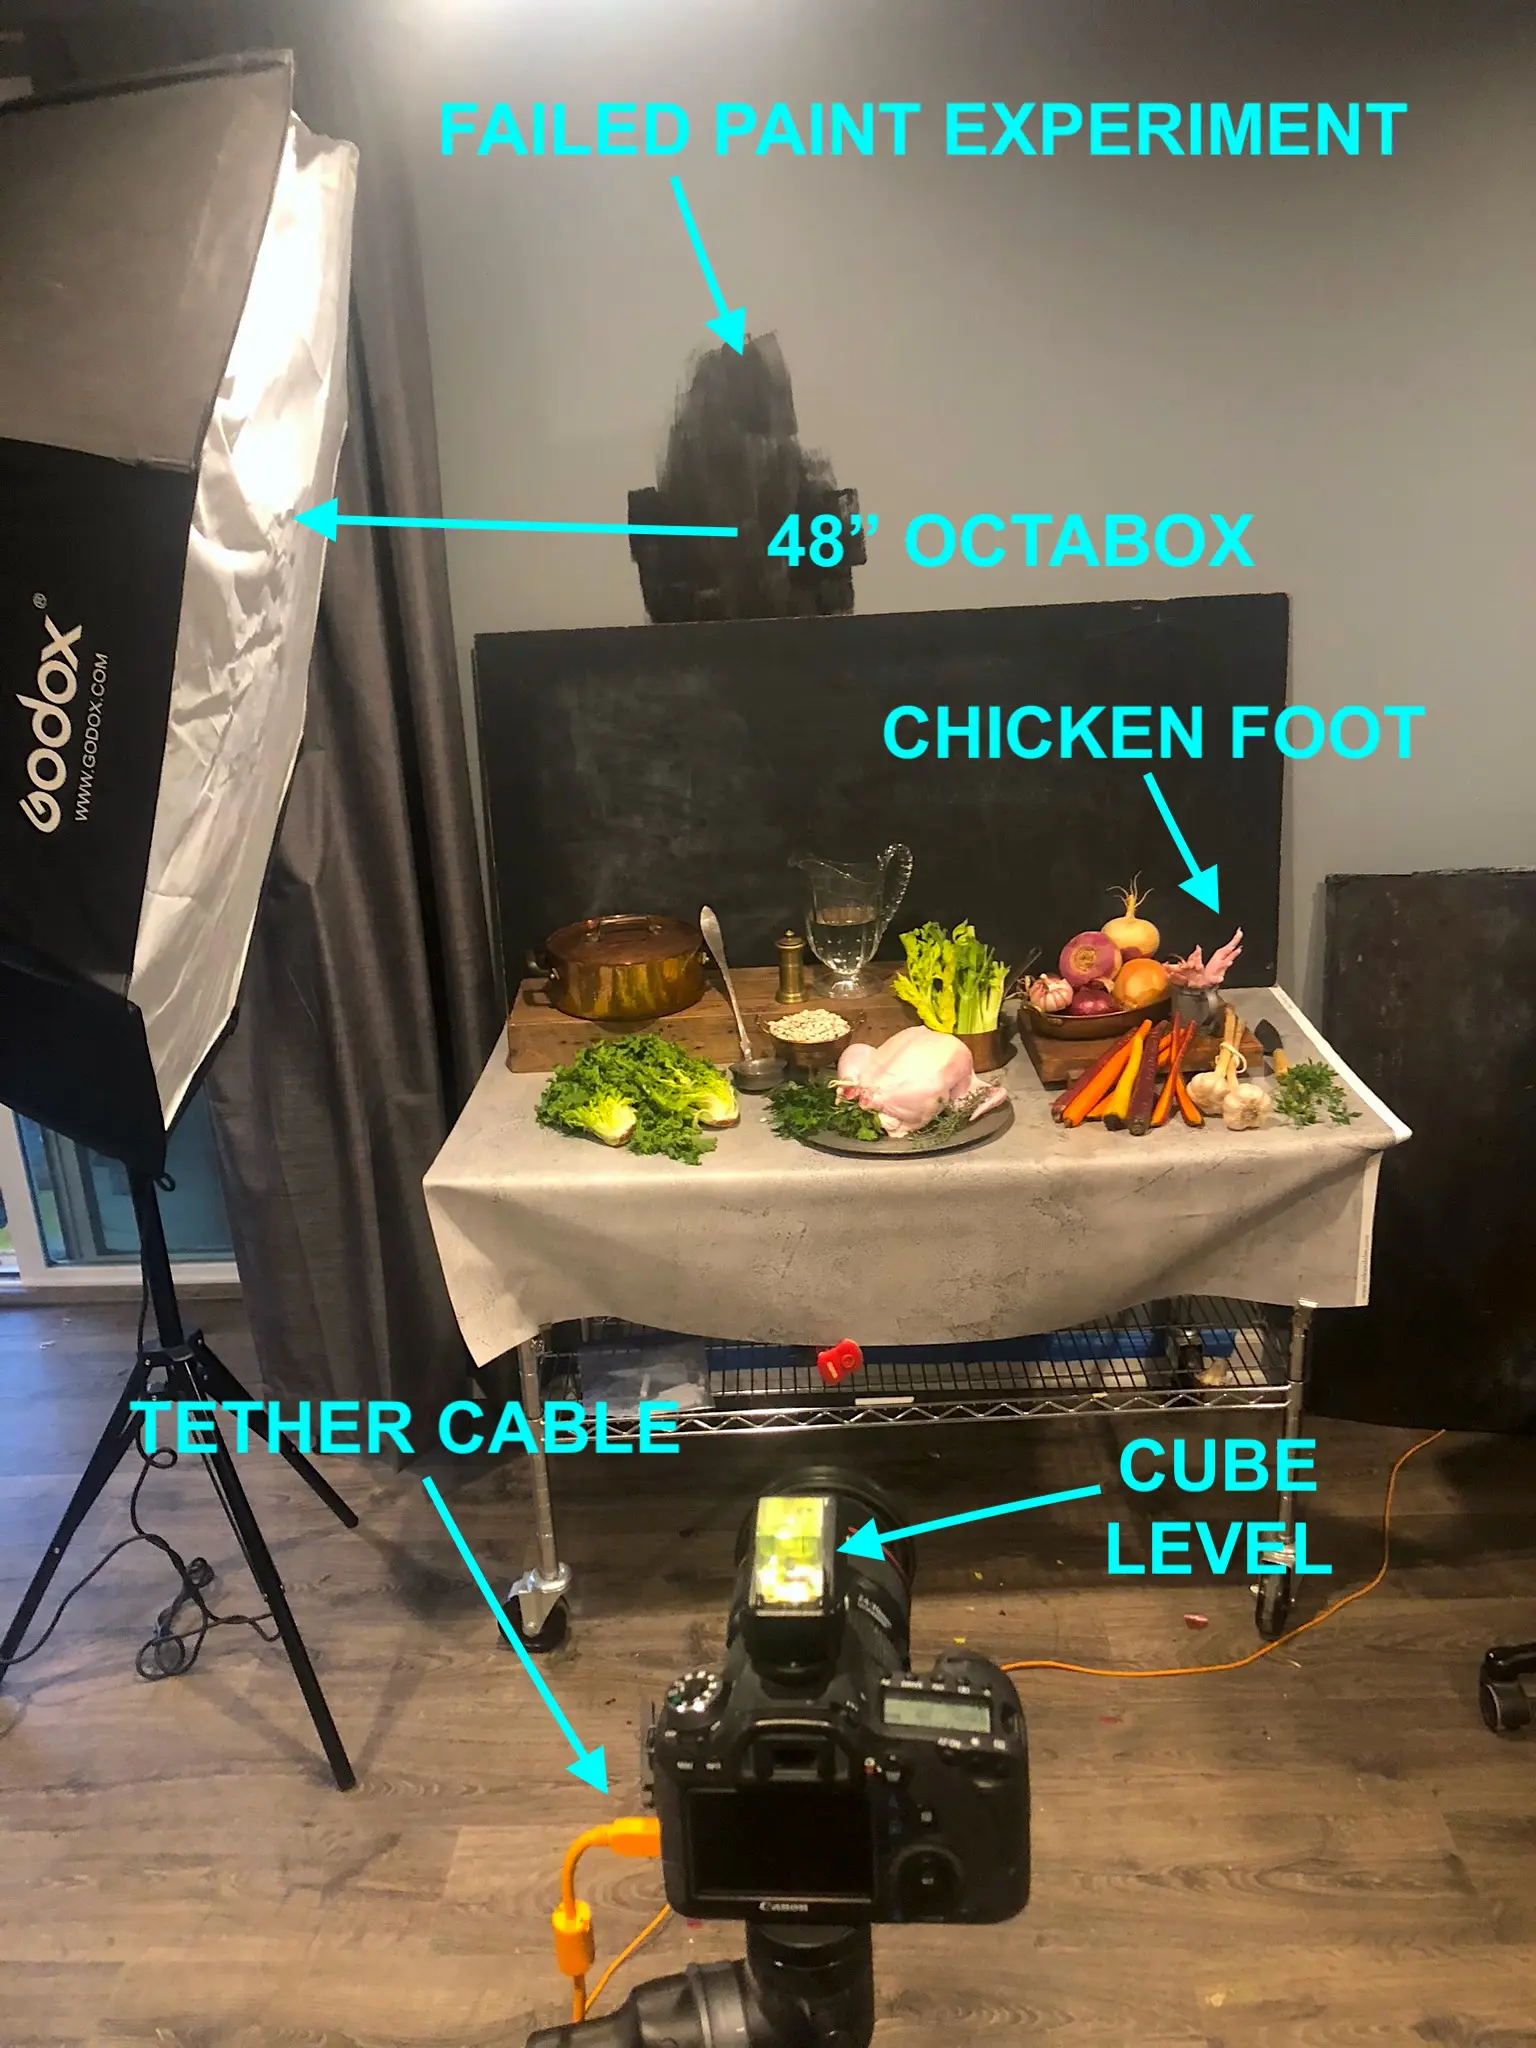
LIGHTS
Starting out with natural light is a great way to learn just how much using the right light can impact your photographs. In the future, we hope to make a full tutorial about our lighting set-up but for now, the main takeaway is that for food photography, light should be either to the side or slightly behind your subject. This will give you highlights and shadows that will give your food depth and contrast.
We used natural (window) light for the first couple of years and it was a great way to learn what looked good. But we often need to shoot at night, and it became clear that we needed an artificial light to shoot our recipes. We started with a small florescent tabletop light (it was this Lowel Ego, which is not made anymore). You can probably make your own DIY version with a Philips 100W Equivalent Daylight 5000K LED Light Bulb and some translucent paper.
Eventually we bought a Raya Octolight set, which comes with its own soft box. This felt like a huge step up and we used these for several years until we decided to try to shoot more action in our shots, which necessitated using a strobe.
We bought a Flashpoint/Godox AD400 strobe (which required buying a separate softbox modifier, see below) and we absolutely LOVE it. There is a learning curb using strobes but they can’t be beat for creating crisp, clean images, especially when capturing motion (think pouring liquid or dusting sugar).
For video, we now use a Godox SL150III continuous light. It’s good, but I think we might need something that goes brighter in the future.
MODIFIERS
There are several types of modifiers which are used to shape, control, and alter the light in a photograph. Softboxes come in different shapes and sizes, and they use diffusion material to spread the light, making it softer. Reflectors bounce light onto a subject, filling in shadows or adding highlights.
Our most-used modifier is the Godox octagonal soft box 48”. It’s large enough to light a 4-foot setup and creates beautiful soft light. For shooting anything reflective (glassware, etc) we use an Impact Square 40×40 plus grid. For small subjects and moodier shots, we use a Westport 2×1 rectangular soft box plus grid. We also occasionally use a Bowens mount snoot which directs light onto a very small area.
STANDS
Stands are incredibly useful for mounting lights, reflectors, gels etc. You almost can’t have enough of them, to be honest. For shooting overheads, we use an Impact CT-40M turtle base C-stand. It’s very sturdy and has a long extender arm on which the camera is mounted.
We also have 2 Impact LS-96HAB 8-foot heavy duty air-cushioned stands for our strobe and continuous lights. We have 2 Impact LS8-AI 8-foot light duty stands for holding reflectors or other light things. This Reflector arm is useful for attaching to the stand.
MISCELLANEOUS ITEMS
- Sandbags are necessary to stabilize tripods, C-stands, etc.
- White and black foam boards for reflecting or blacking light.
- A color chart like this Datacolor SpyderCHECKR 24 Color Chart is helpful for white balance and balancing colors in post production.
- A Cube level is helpful to make sure the camera is straight.
- A quality tethering cable is needed to shoot tethered to a laptop.
- Monitors are helpful to clearly see what’s in the viewfinder.
…
educational resources we recommend
We call ourselves “self-taught” but that’s not really true. We’ve learned so much from some very talented educators in the food photography space. These are the educators and courses we’ve used that have been instrumental in our growth.
- Joanie Simon — The Bite Shot // Joanie is a talented food photographer and an incredible educator. She has many free instructional videos on her Youtube channel, but it was her Artificial Academy course that really helped us bring our work to the next level. It was absolutely worth it.
- Rachel Korinek — Two Loves Studio // Rachel is a fantastic food photographer and we’ve used many of her tutorials over the years. Highly recommended.
- Skyler Burt — We Eat Together // Skylar a commercial food, beverage and product photographer. He has a lot of very helpful tutorials.
- Lola Faura — Lola is a professional food stylist with many free helpful tutorials. If food styling is your passion, her full course is well worth the money.